
Diving under sea ice cracks is a beautiful experience
Reply

Here is a photo showing where two of our dive sites are located, relative to the shores of Ross Island and the McMurdo water intake jetty.

As you can see, the huts are located quite close to shore, but the depth of the seafloor under each hut is ~75ft (Jetty) and ~90ft (Dayton’s Wall). I really love this view across the McMurdo Sound sea ice, with the Transantarctic Mountain Range in the distance. A view to behold indeed…
We did our first dive 16 days ago (on September 7th), and since then, we have done ~20 dives! Here is a group photo we took immediately after our first full dive.

The first dive we did took a long time to get ready for. The only kit we brought with us was our dry suits and thermal under-suits. Everything else was provided by the United States Antarctic Program (USAP). Antarctic waters are among the coldest a research diver can expect to experience (-1.89°C or 28.6°F in McMurdo Sound). In these temperatures, not all diving equipment can be expected to operate properly, and malfunctions can be frequent if the wrong kit is used.
USAP’s diving gear is tried-and-tested, and therefore less likely to fail compared to personal gear, which can be of various models, ages, and qualities. Diving under the ice in Antarctica is not the place where you want your gear to break! So, for this reason, our first dive was slow as we had to check, and re-check our kit, some of which we had never used before. However, two weeks later, we finally got into a nice rhythm. So, for today’s blog, I thought I would walk you through our daily routine of getting kitted up and ready to dive!
At 8:30 am, I walk from the lab down to the dive locker (the little blue building in the photo below). The view on this walk is just awful guys…

Next its time to grab a tank:

The tanks we use are 2400 psi (pounds per square inch) steel cylinders (95 cu ft or 2690 L volume). Steel cylinders are preferred to aluminum cylinders for durability in cold temperatures. Here at McMurdo, divers are required to use two fully independent first and second-stage regulators (a regulator is a device that delivers air to the diver’s mouth underwater). This is because if one freezes and starts to free-flow (i.e., purging air uncontrollably), you can easily turn off the gas to that one, pick up your second regulator and keep breathing…yay! So, for that reason, the cylinders here have a “Y” valve, as shown above.
Next, it’s time to grab the regulators:
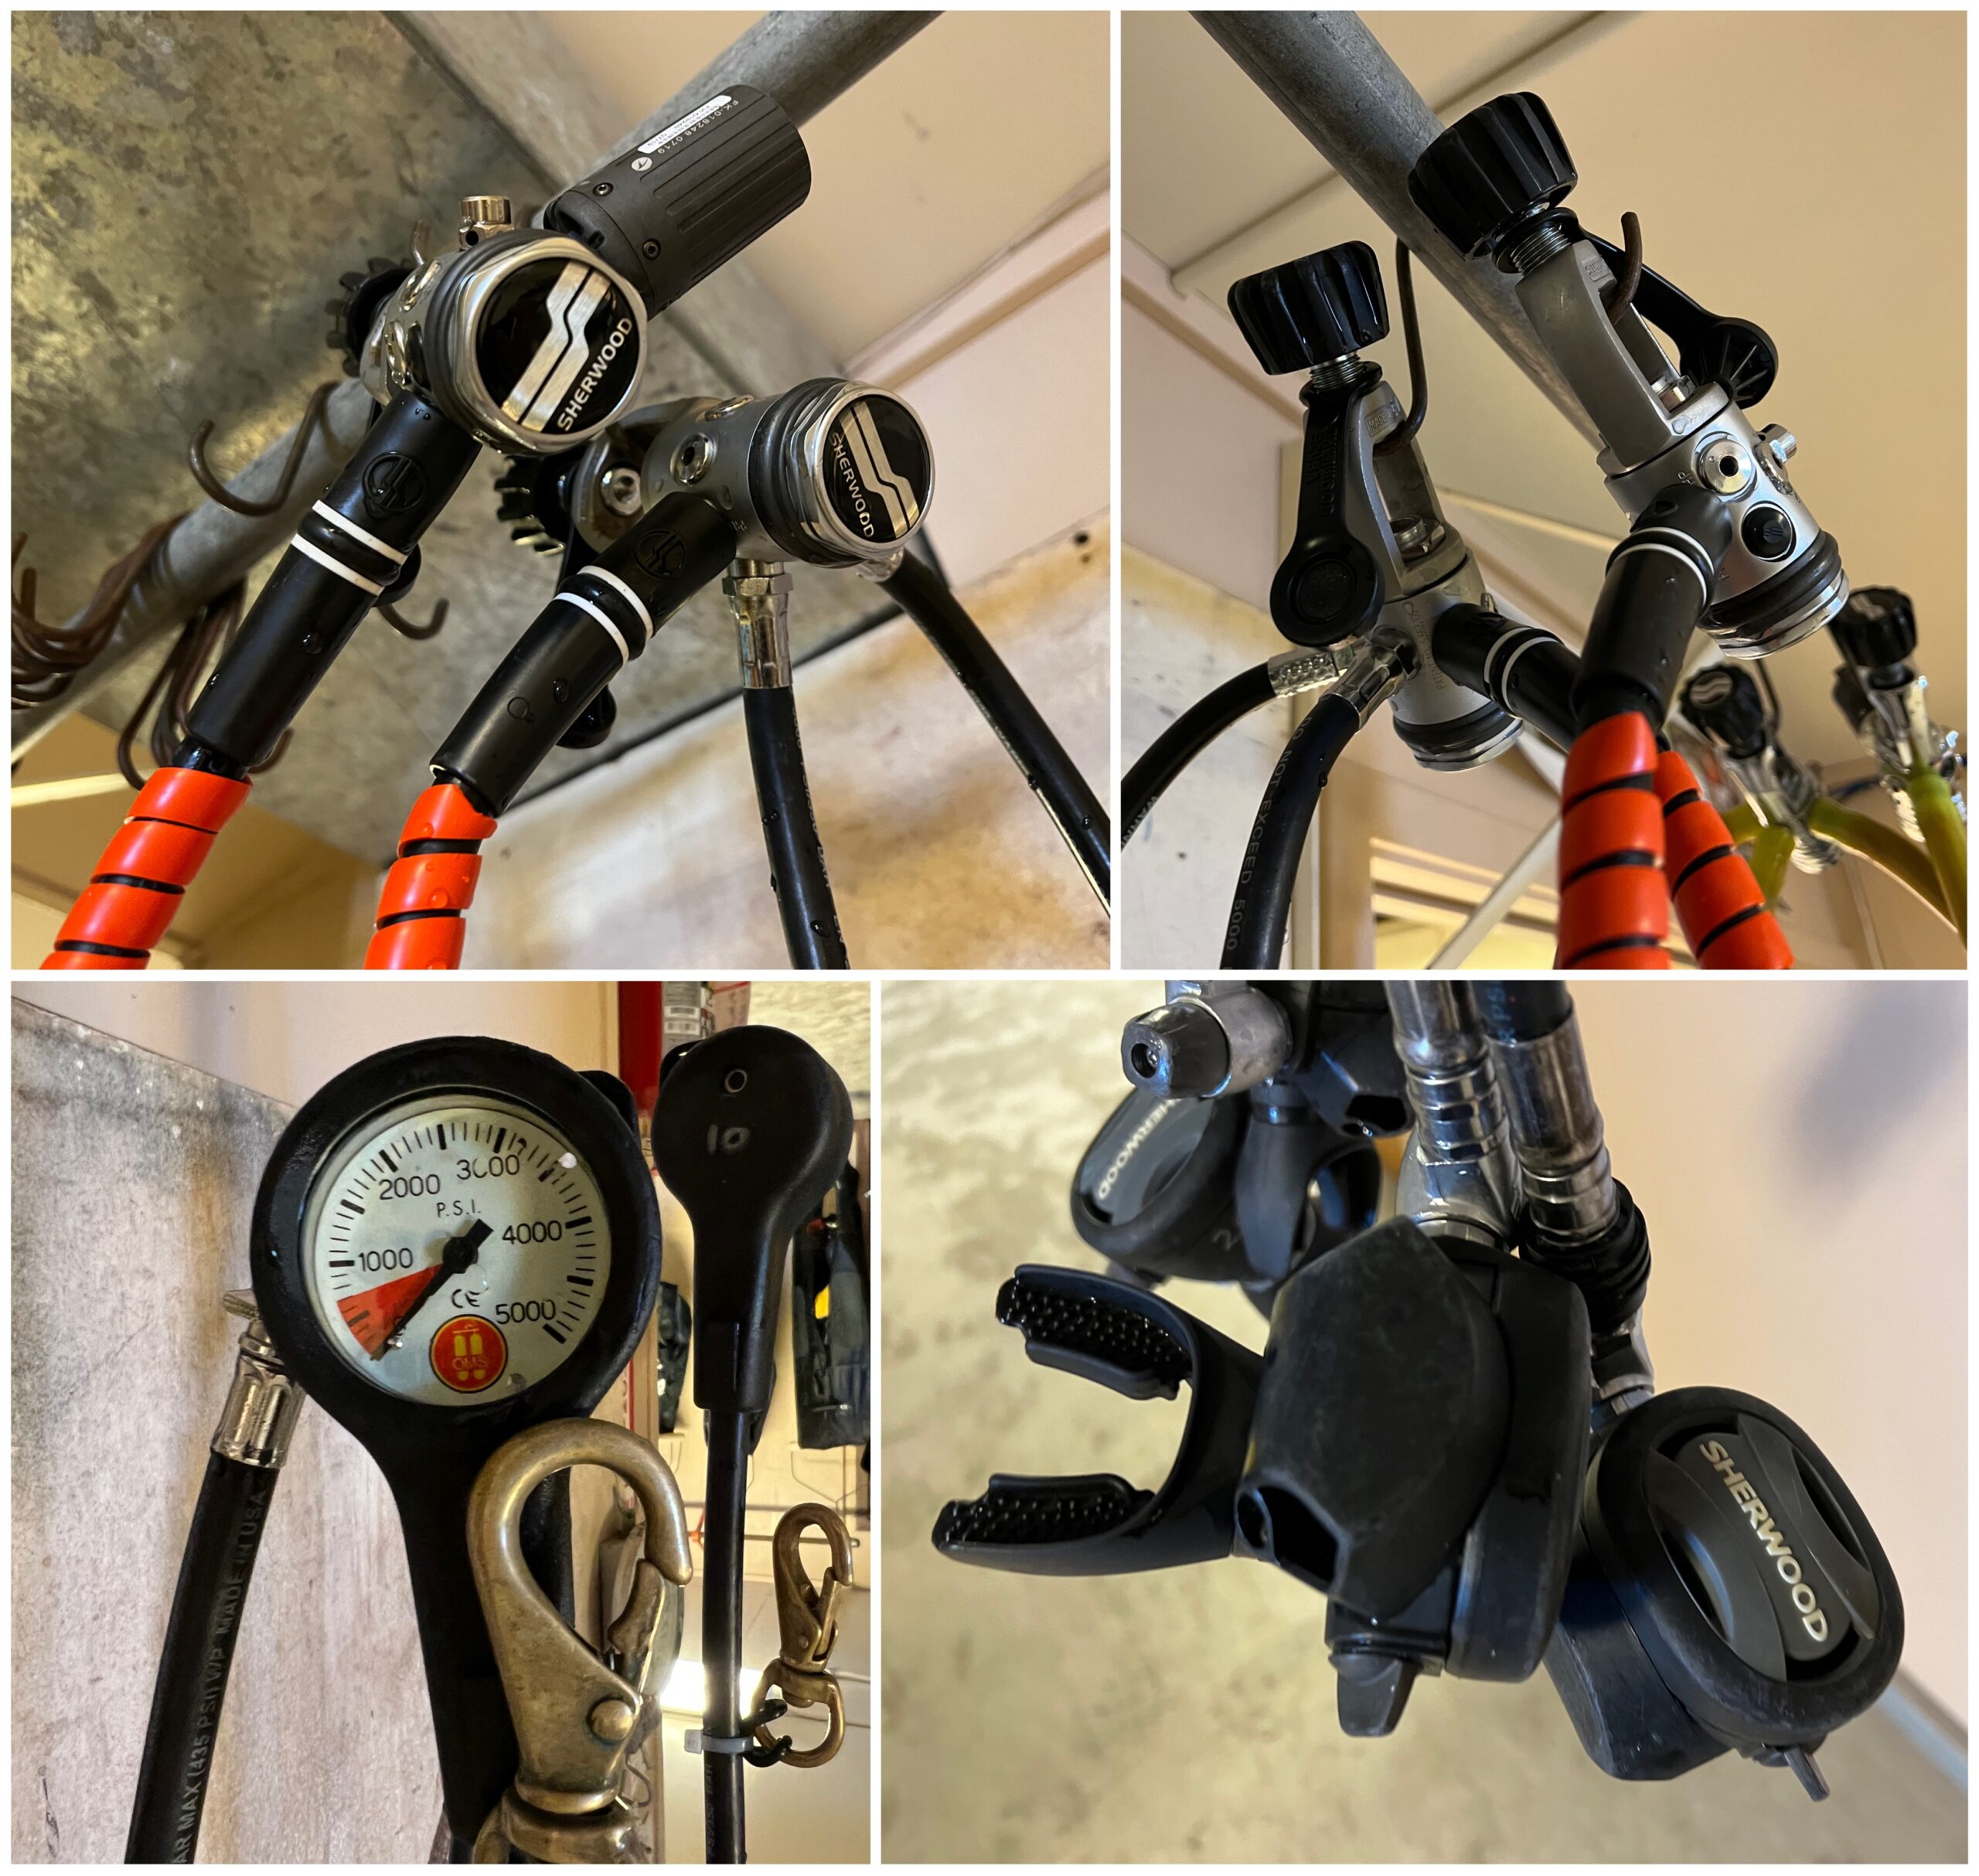
The only regulators which are currently approved for use here at McMurdo are the Sherwood Maximus SRB 7600 first and second-stage regulators (shown above). As you can see, one of them has three hoses attached, and these are for 1) your backup regulator, 2) the air pressure gauge, and 3) the dry suit inflator hose. The other regulator only has one hose: for the main regulator. As this regulator only has one hose, valve, O-ring, etc., it is less likely to freeze and/or fail (*knocking on wood frantically*).
Next, it’s time to attach the backplate and the regulators to the cylinder:

The backplate allows us to strap the tanks to our back. This is a good time to turn on the air and check that the tanks are full by looking at the mechanical pressure gauge.
After the tanks are set up, it’s time to pack up our gear bags. All the gear is washed and hung up at the end of every day. Luckily, Antarctica is of the driest places on earth, so our gear is always dry-as-a-bone in the morning!

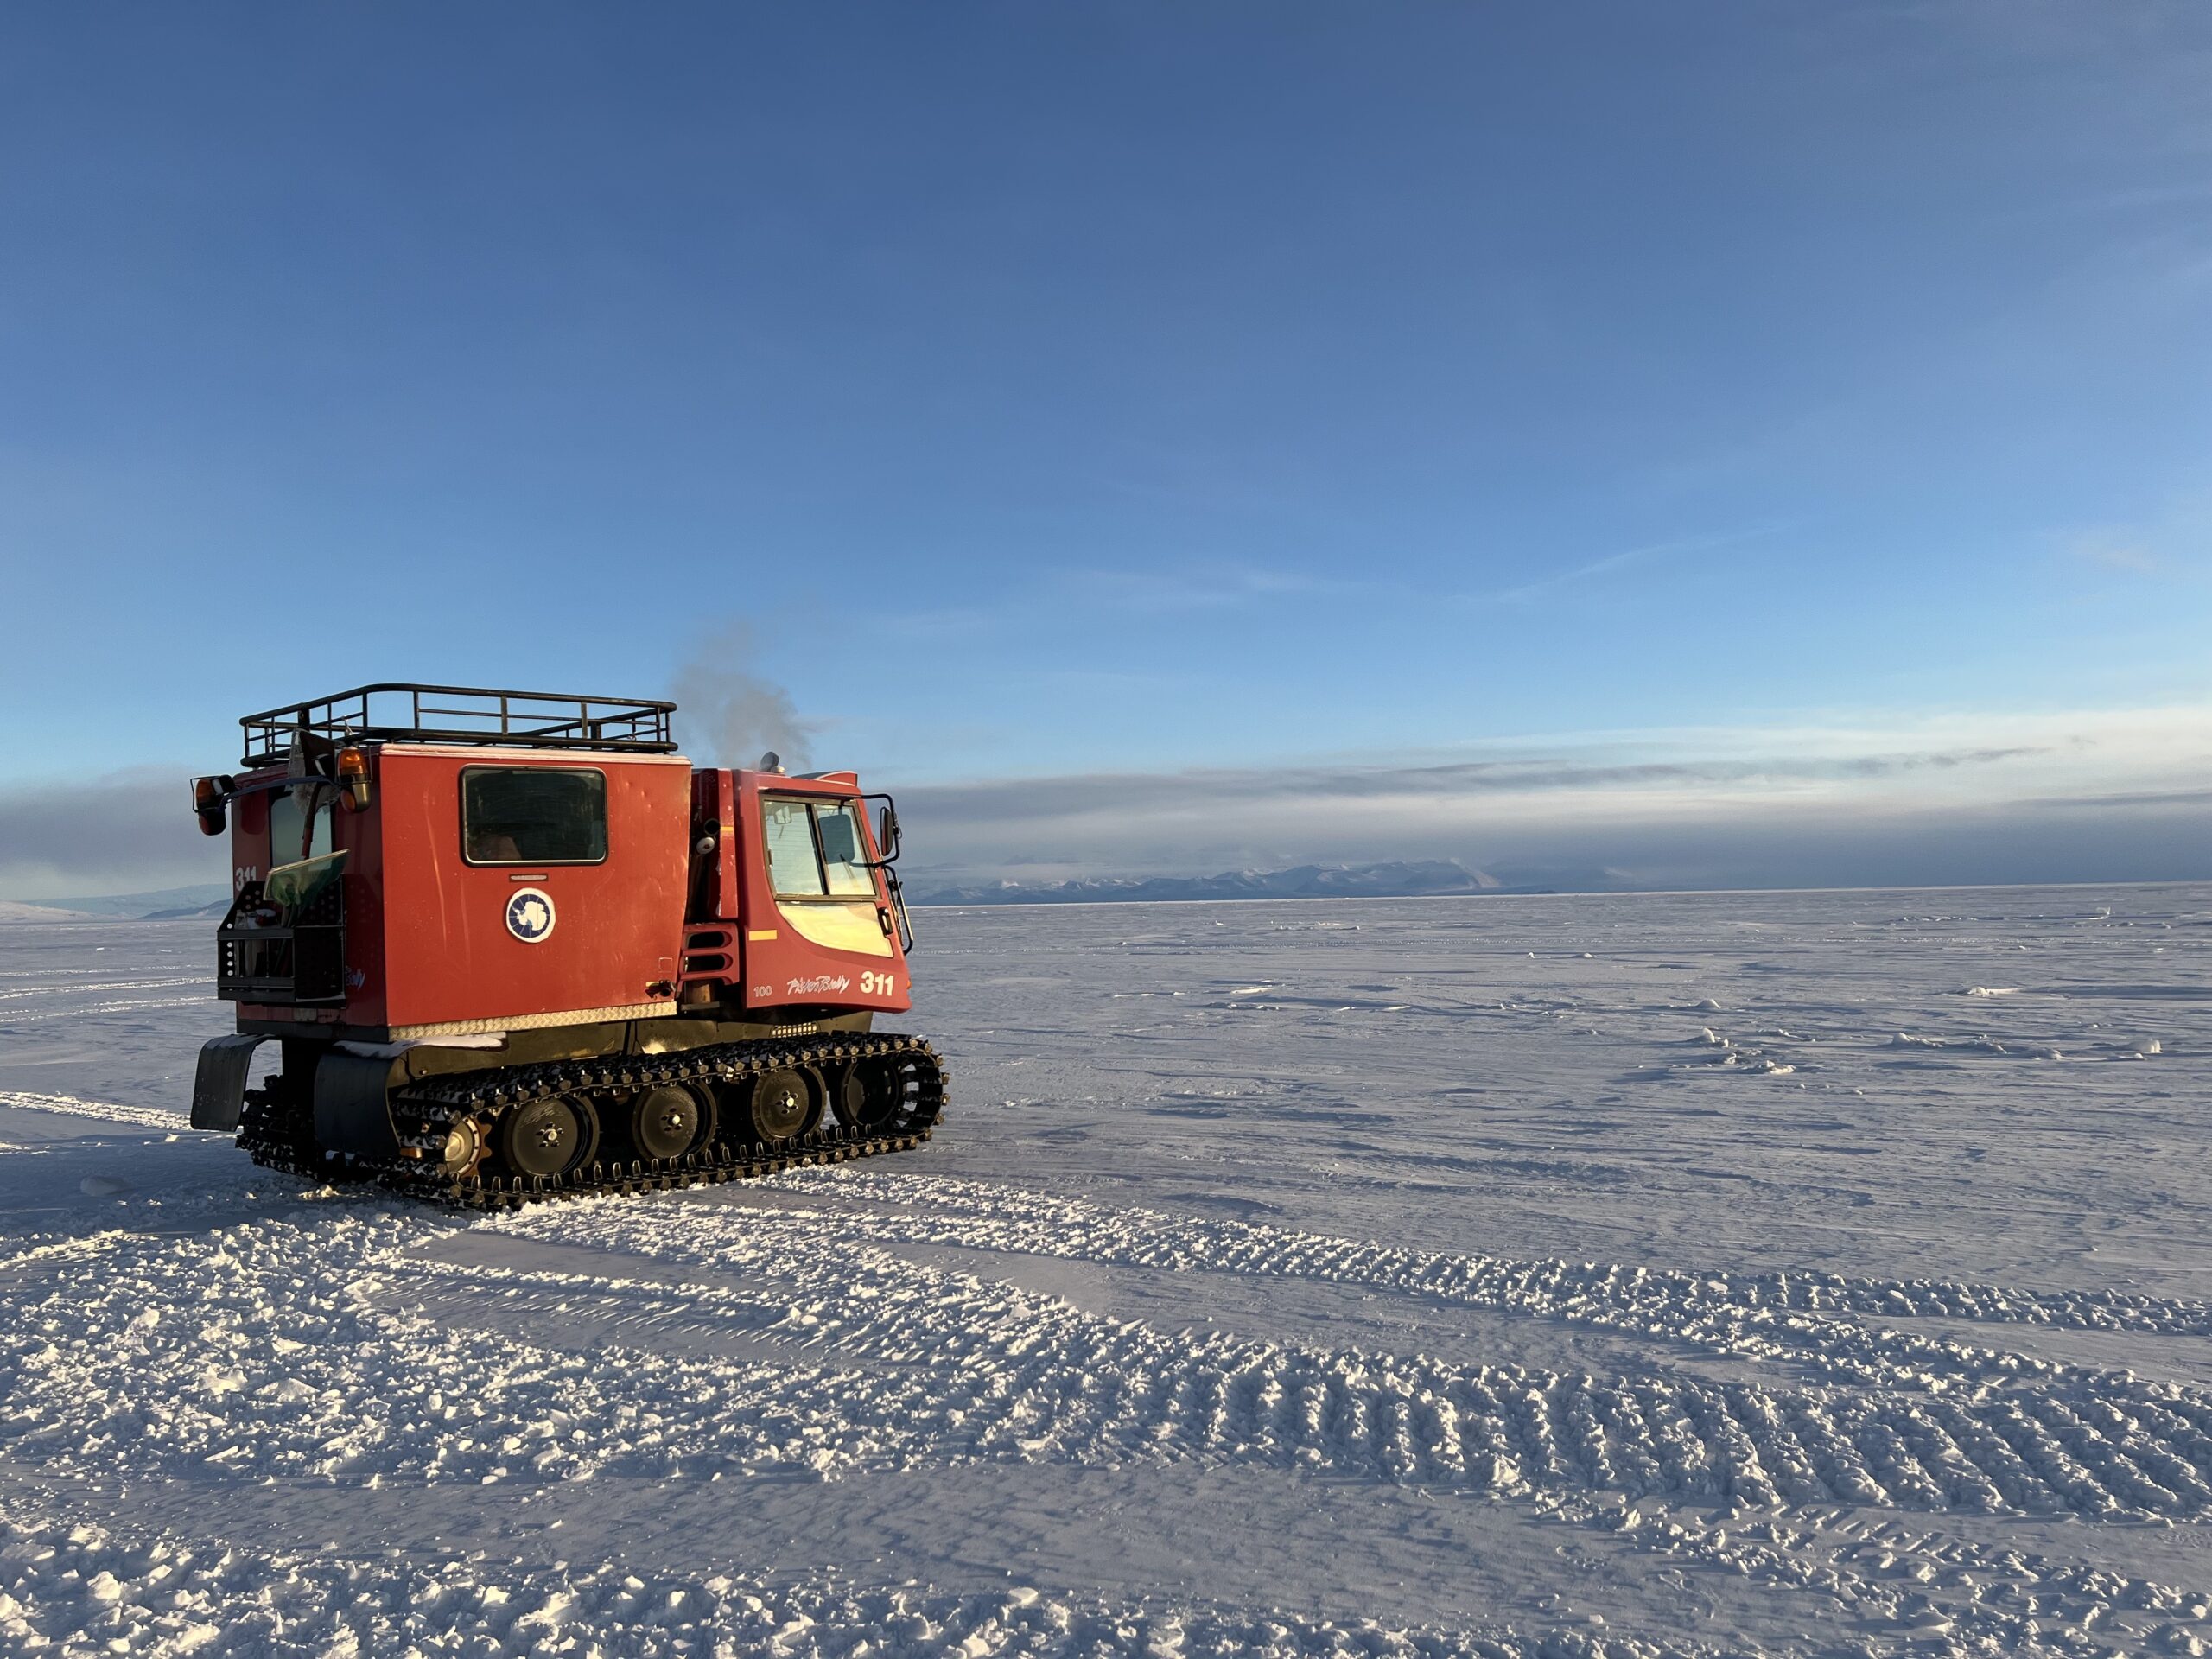
After loading our tanks and bags into the Pistin Bully (the tracked vehicle we use for getting out onto the sea ice), it’s time to get suited up! The first layer we wear is long underwear thermals, as modeled by Andrew below:

Next, we don our thick insulating layer.

We use The Weezle Extreme Plus undersuit – and I have to say, this thing is amazing. It’s like wearing a sleeping bag – it is SO cozy. In fact, a few months ago, I actually took this camping, and it was perfect!
After this, we wriggle into our dry suits:

We are using the DUI Yukon II suits and they are wonderful. They were made to measure and are by far the best dry suit I have ever used.
Now that we are suited up, we load into the Pistin Bully (red vehicle shown below) are begin the very long drive to our dive hut. It takes approximately 3 minutes to get there 😂

We then unload our kit into the shed. Check out this video:
When we are situated within the warm cozy dive hut, we start to get kitted up!
The first thing we do when we sit next to the dive hole is to put on our ankle weights (2lbs). The ankle weights are just to help us maintain a horizontal position (or trim) when underwater.

Next, we put on our fins. This is a very important step because if we fall into the hole, we want to be able to kick and stay afloat! Lila models this below:

Sometimes, one of us forgets to don the fins first, at which point the team will ask them “have you ever been to FINland?” or “are you sure you’re FINished?”…. sarcasm and puns-galore in the dive hut, daily 😂
Next, we wrestle into the weight belts:

We are using DUI weight harnesses with ditch-able weight pockets. Each of us is wearing 40 lbs (or 18 kg) of lead weight, and boy – are they heavy! We need this much weight to help us sink, as our Weezle undersuits are so puffy, and therefore extra-buoyant. Now is the time in the process to be extra careful: you don’t want to fall into the hole wearing all that weight, but with no tank.
So naturally, the next item we strap ourselves into is the tank-backplate/reg set-up.

But first… the most important step of the day: MAKE SURE YOUR AIR IS ON! This step is so important (for obvious reasons) that when we do it, we even call out “I am turning my air on” to let everyone else know what we are doing – and to remind them to do it too!
Once the tank is attached around our shoulders and waist, we clip the dry suit inflator hose to our suit using the chest valve. In the photos below, the silver clip in the left photo attaches to the silver valve of the dry suit in the right photo.

This inflator hose lets us add air to our dry suit, which is how we control our buoyancy underwater. We do not use SCUBA Buoyancy Compensation Devices (BCDs) when diving under fast ice here at McMurdo. So, your dry suit is the only way in which we achieve neutral buoyancy underwater. This was a first for me in my diving career – and initially, it took some getting used to – but now it is second nature!
Then we clip the mechanical pressure gauge and backup regulator to our backplate webbing to keep them from dangling/dragging on the seafloor.
The next items we don are our hoods…plural!

Your head is an area of your body where you can lose the most body heat. Therefore, we wear lots of layers to try and stay warm.
The first hood we wear is made from thin neoprene (3-5mm thickness) and is referred to as a gorilla hood (top left hood in photos above). This hood covers all our head, except our eyes and mouth. Honestly, it looks like we are about to rob a bank when we put these on. They look a bit silly, but they do keep your face warm, which is more important!
The second hood is made of thin latex and is attached to our dry suits. This helps keep the icy cold water from getting near our neck seal, and around our head.
The outer hood is a thicker neoprene hood (7 or 11mm thickness) and is purely for thermal protection.
When all hoods are donned, we put on our masks.

We then have to carefully go around the silicon edge of mask and slide it underneath all the hoods. If we don’t manage to get a good seal, we would have a mask flood underwater, which would be annoying, but more importantly, horribly cold. Brrrrrr!
Next, it’s time for the dive computer. A dive computer provides all the real-time information divers need to be able to dive well, including depth, time, safety stop, and no decompression limit (NDL) data. All USAP divers must use the dive computers that are issued by the McMurdo dive lockers. Currently, they are the Shearwater Perdix AI model.

The computer communicates with an air pressure transmitter that is attached to our regulators, and therefore our computer knows exactly how much air we have left at all times.
The last step in getting suited up is our gloves. Hands are the main factor that determines the length of a dive in Antarctica – they get SO COLD! Once dexterity is lost in the diver’s hands, the dive needs to be ended quickly. For me, I can manage about 30 minutes under the ice. After that, my fingers start to get cripplingly sore, and I can’t really move them anymore. As I am usually carrying a camera, this makes it very difficult to take any more photos as I can’t even press the shutter button! More importantly, though, a diver needs to maintain dexterity at the end of a dive to be able to use their suit inflator or change to their backup regulator in an emergency.
We install dry gloves on our suits using the Kubi ring system.

With these, we can attach basically any rubberized glove to a ring. I bought the orange gloves shown above in a fishing supply store! The other ring attaches to the silicon wrist seal on our dry suits. Then these two rings push together and seal by means of a red O-ring. A simple but effective design! So long as no fluff or hairs are caught in the O-ring, we are able to keep our hands dry throughout the dive! Trust me, if there is a leak – you will know about it very quickly as you go underwater!
We insert small diameter plastic tubes under the silicon wrist seal on our dry suit to allow us to fill our gloves with air from the body compartment of our suits. This lets us equalize our hands at depth which prevents skin pinching caused by high pressure underwater, but more importantly, helps to keep our hands warm. Well… they are never warm. It helps us keep our fingers not frozen, which would be a better description!

Under the rubber gloves, we were fleece gloves. I also use hand warmers, as I get extra cold.

Regulators go into mouths, and it’s time to jump in! Check out this video of us getting into the ice hole:
The key is to twist your body enough so that the tank doesn’t catch on the wooden floor of the hut as you go down… because, ouchy.
Finally, here is the coolest video ever made. Andrew used his 360 degree-GoPro camera to film us getting kitted up and jumping into the dive hole!

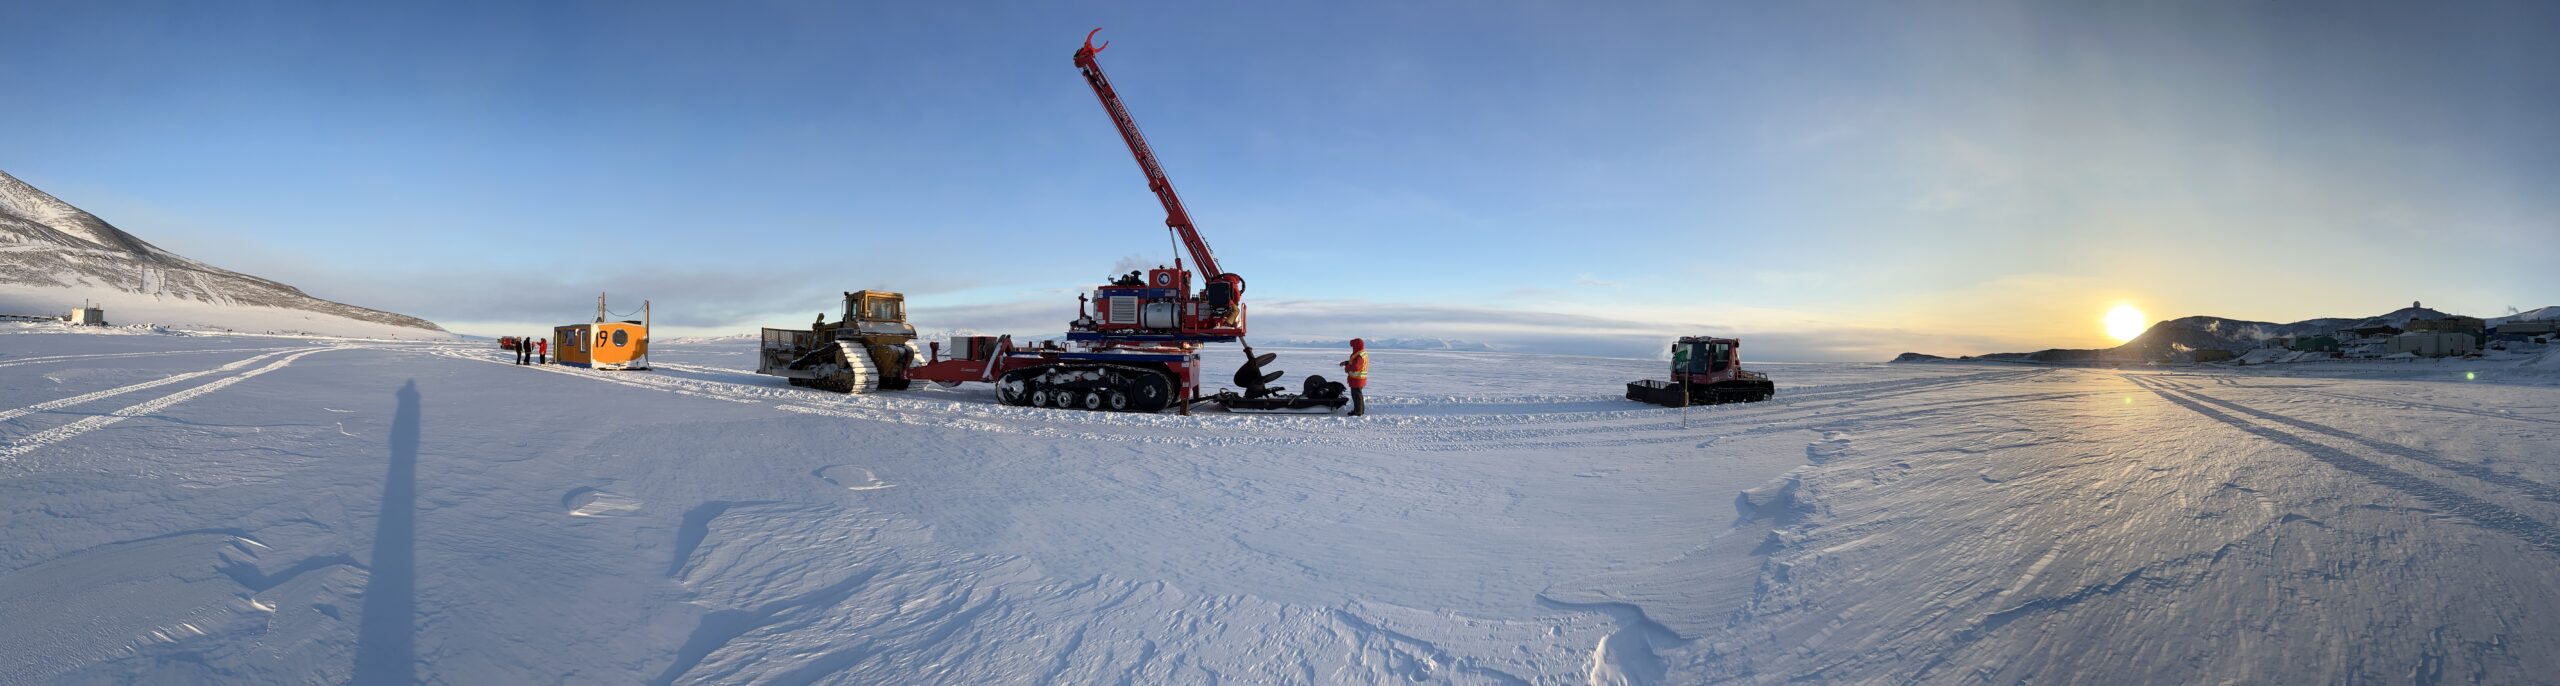
On September 6th, we met the Fleet Operations (“Fleet Ops”) team on the sea ice to start drilling our dive hole!
The first place where we dive is known as “The Jetty” and is located ~100m from the shores of McMurdo Station.

The overall process of getting the dive hole drilled took approximately 4 hours. The first step was to tow the drill and dive hut out onto the ice.

The dozer dragged the drill to the exact place where we wanted the hole. The next step was to attach the screw bit to the TEREX drill. The drill bit is so heavy that it could not be attached prior to towing the drill.

Then it was time to start drilling. Check out this video we took of the drilling process:
Once the hole was drilled, we had to scoop out some of the platelet ice that had been knocked down into the hole. Turned out, that scooping slushy ice out from an ice hole using nets was a quick way to get warm on this day which was particularly chilly. When the hole was ready, the drill rig was moved away.

The next step was to tow the dive hut, carefully aligning it, so that the hole in the floor of the hut was directly above the hole in the ice.

The dive hut is approximately 20ft long and 10ft wide. Inside there is a diesel heater to keep us warm before and (more importantly) after a dive.
Through the hole, we hang a weighted “down line” to the sea floor (the rope is ~80ft long). Along the line are various loops where we attach flashing lights (to help us find the hole when diving), an emergency air tank (aka pony bottle), and any other kit or camera equipment we want to pick up at the start of a dive or drop off at the end.

The snow on top of the sea ice is ~2ft deep in this area, and as a result, there is very little light that passes through. This means that diving here is basically a night dive. Therefore, the flashing lights on the downline are critical for us to find our way back to the dive hole.
We are currently living/working at McMurdo Station, located at the end of the Hut Point Peninsula of Ross Island, which is the solid ground farthest south accessible by ship and the most southern place in the world to SCUBA dive!
Ross Island is located within the Ross Sea, and where we dive is within the McMurdo Sound. To the south of Ross Island (top/top-left of map below) you can see the permanent Ross Ice Shelf.

An ice shelf is basically a floating glacier that forms where an ice sheet flows down to a coastline and onto the ocean surface. An ice sheet is any mass of glacial land ice extending more than 50,000 square kilometers (20,000 square miles). The Antarctic ice sheet covers about 98% of the Antarctic continent and is the largest single mass of ice on Earth, with an average thickness of over 2 kilometers. The ice shelf and neighboring ice sheet (both composed of frozen freshwater) are permanent features in Antarctica and are present year-round.
Conversely, there is also transient seasonal sea ice here. Sea ice is frozen salt water that melts and refreezes every year in Antarctica.

The extent of sea ice in a given year varies according to climate variability and long-term climate change. Antarctic sea ice usually peaks in September (the end of Southern Hemisphere winter) and retreats to a minimum in February. Check out the satellite image below showing areas of the Ross Sea covered in sea ice taken in a previous year.

In a “normal” year – the size of the continent of Antarctica doubles due to sea ice growth… but not this year.
This past winter in Antarctica has been unseasonably warm. That, coupled with unfavorable storms blowing ice out of the McMurdo Sound, has resulted in the lowest recorded sea ice extent and thickness ever for this area. August 19th, 2022 (only 10 days before we arrived in Antarctica) was the first day of sea ice growth here. As this is the end of winter, the sea ice is usually well established by this point. This is not encouraging news for a team of SCUBA divers who rely on sea ice in order to dive!
So the start of this trip has been stressful. Every day we have been monitoring the weather and literally sitting, watching, and waiting for sea water to freeze. We need thick enough sea ice in order to drive vehicles out to our dive sites, drill a hole, and dive through. Without the sea ice, we can’t get to where we need to go.
Luckily, one of our dive sites is located very close to McMurdo Station, in an area where there has been sea ice for a while. But before we were allowed to work there, we had to complete the Sea Ice Safety Training course.
First, we learned about the various factors which affect the thickness of the ice.

Ice strength directly correlates to ice temperature, which is in turn affected by air temperature. Because of this, snow cover on top of the ice actually slows ice growth as it insulates the ice from the cold air temperature. High solar radiation decreases ice growth rate. In addition, if the albedo (amount of light reflected by the ice) is low then ice growth is also reduced. Ice close to the shore tends to get “dirty” due to dust and dirt which is blown onto it from the land. The dark-colored dirt causes the ice to absorb more solar radiation, reduces albedo, and consequently slows ice growth. Finally, depending on the direction of wind and ocean currents, ice growth can be impeded if the newly formed ice is constantly being swept away.
Next, we learned about the hazards associated with sea ice.

The main hazards which concern us are cracks in the sea ice, also known as “leads”. When driving across sea ice, first you need to spot a crack (which can be difficult if it is covered with snow), and then you need to profile it. The width and depth of the crack determine whether or not it is safe for your vehicle to travel over the crack safely without risk of falling through to the icy ocean below (which has happened before!)
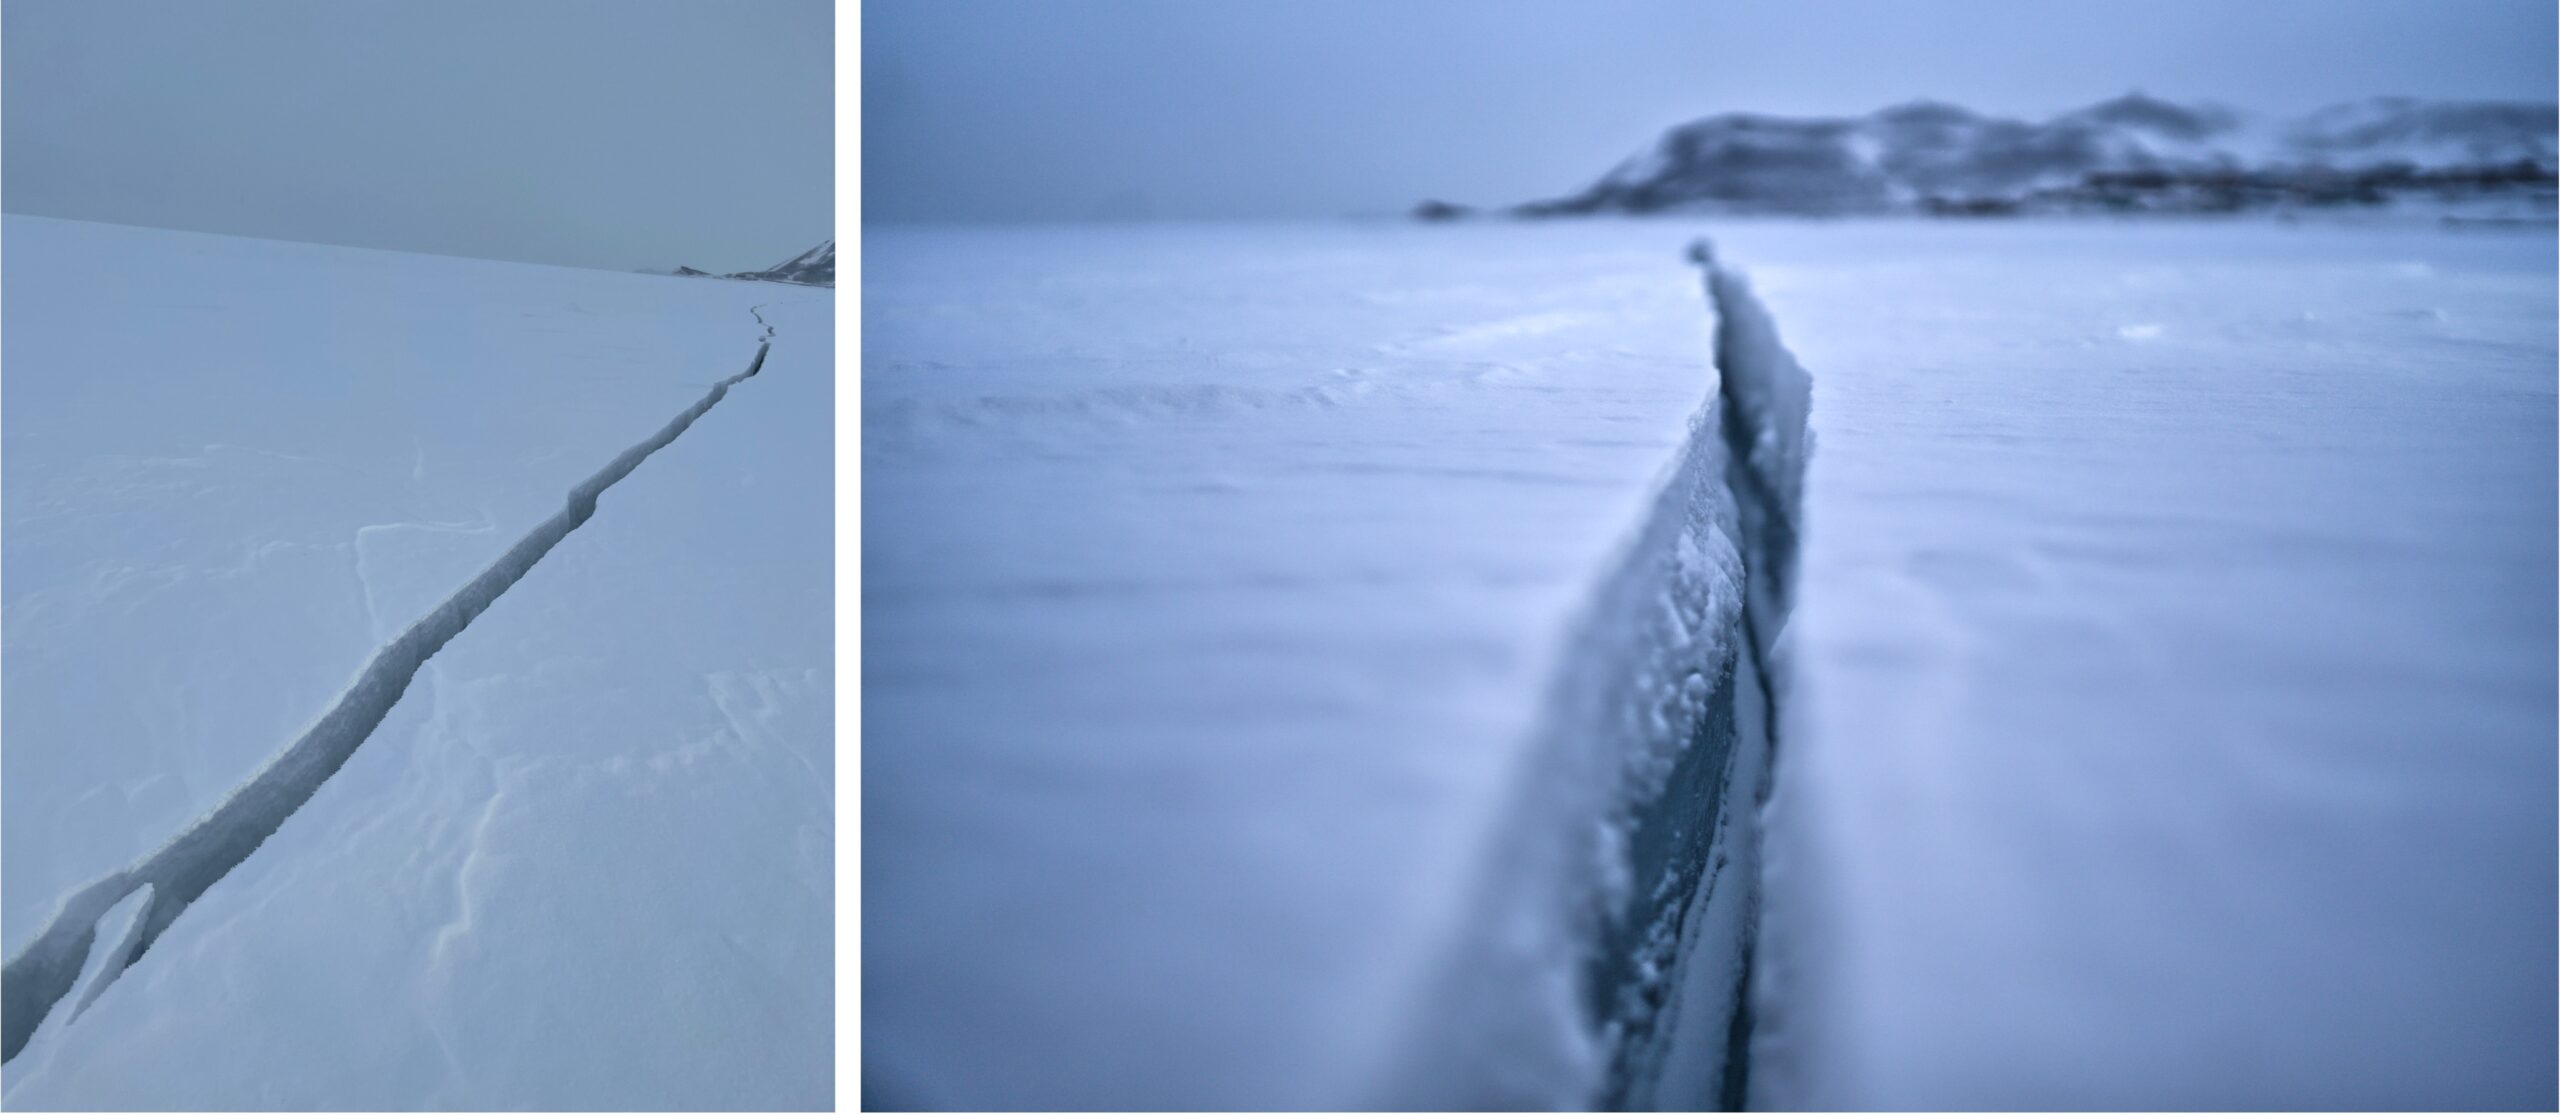
The next thing we were taught was that sea ice cracks are consistently unpredictable!

In the slide above are two pictures of the same sea ice crack, taken 6 days apart! Within 24 hours the crack increased in width by 20cm. Three days later the crack was giant (>1m wide), and then within a few days, the temperatures increased causing the ice to expand and thus the two sides of the sea ice slammed together to form what is known as a pressure ridge (Oct 5th photo). This is a great example of how dynamic and fluctuating the sea ice cracks can be.
There are three types of sea ice crack:

Our instructor jokingly referred to the straight edge cracks as “Bob Ross” cracks, as they are lovely and clean lines! Working cracks are constantly opening and closing. Tidal cracks form close to shore and are a result of ice freezing to land and cracking as the water-level moves with the tides.
When you come across a crack, there are several steps you must follow before driving across:

So now we know the theory about sea ice cracks and how to profile them. Time to get out there and have a look in person!
To get out onto the sea ice we traveled in a Hagglund – a tracked, all-terrain vehicle.


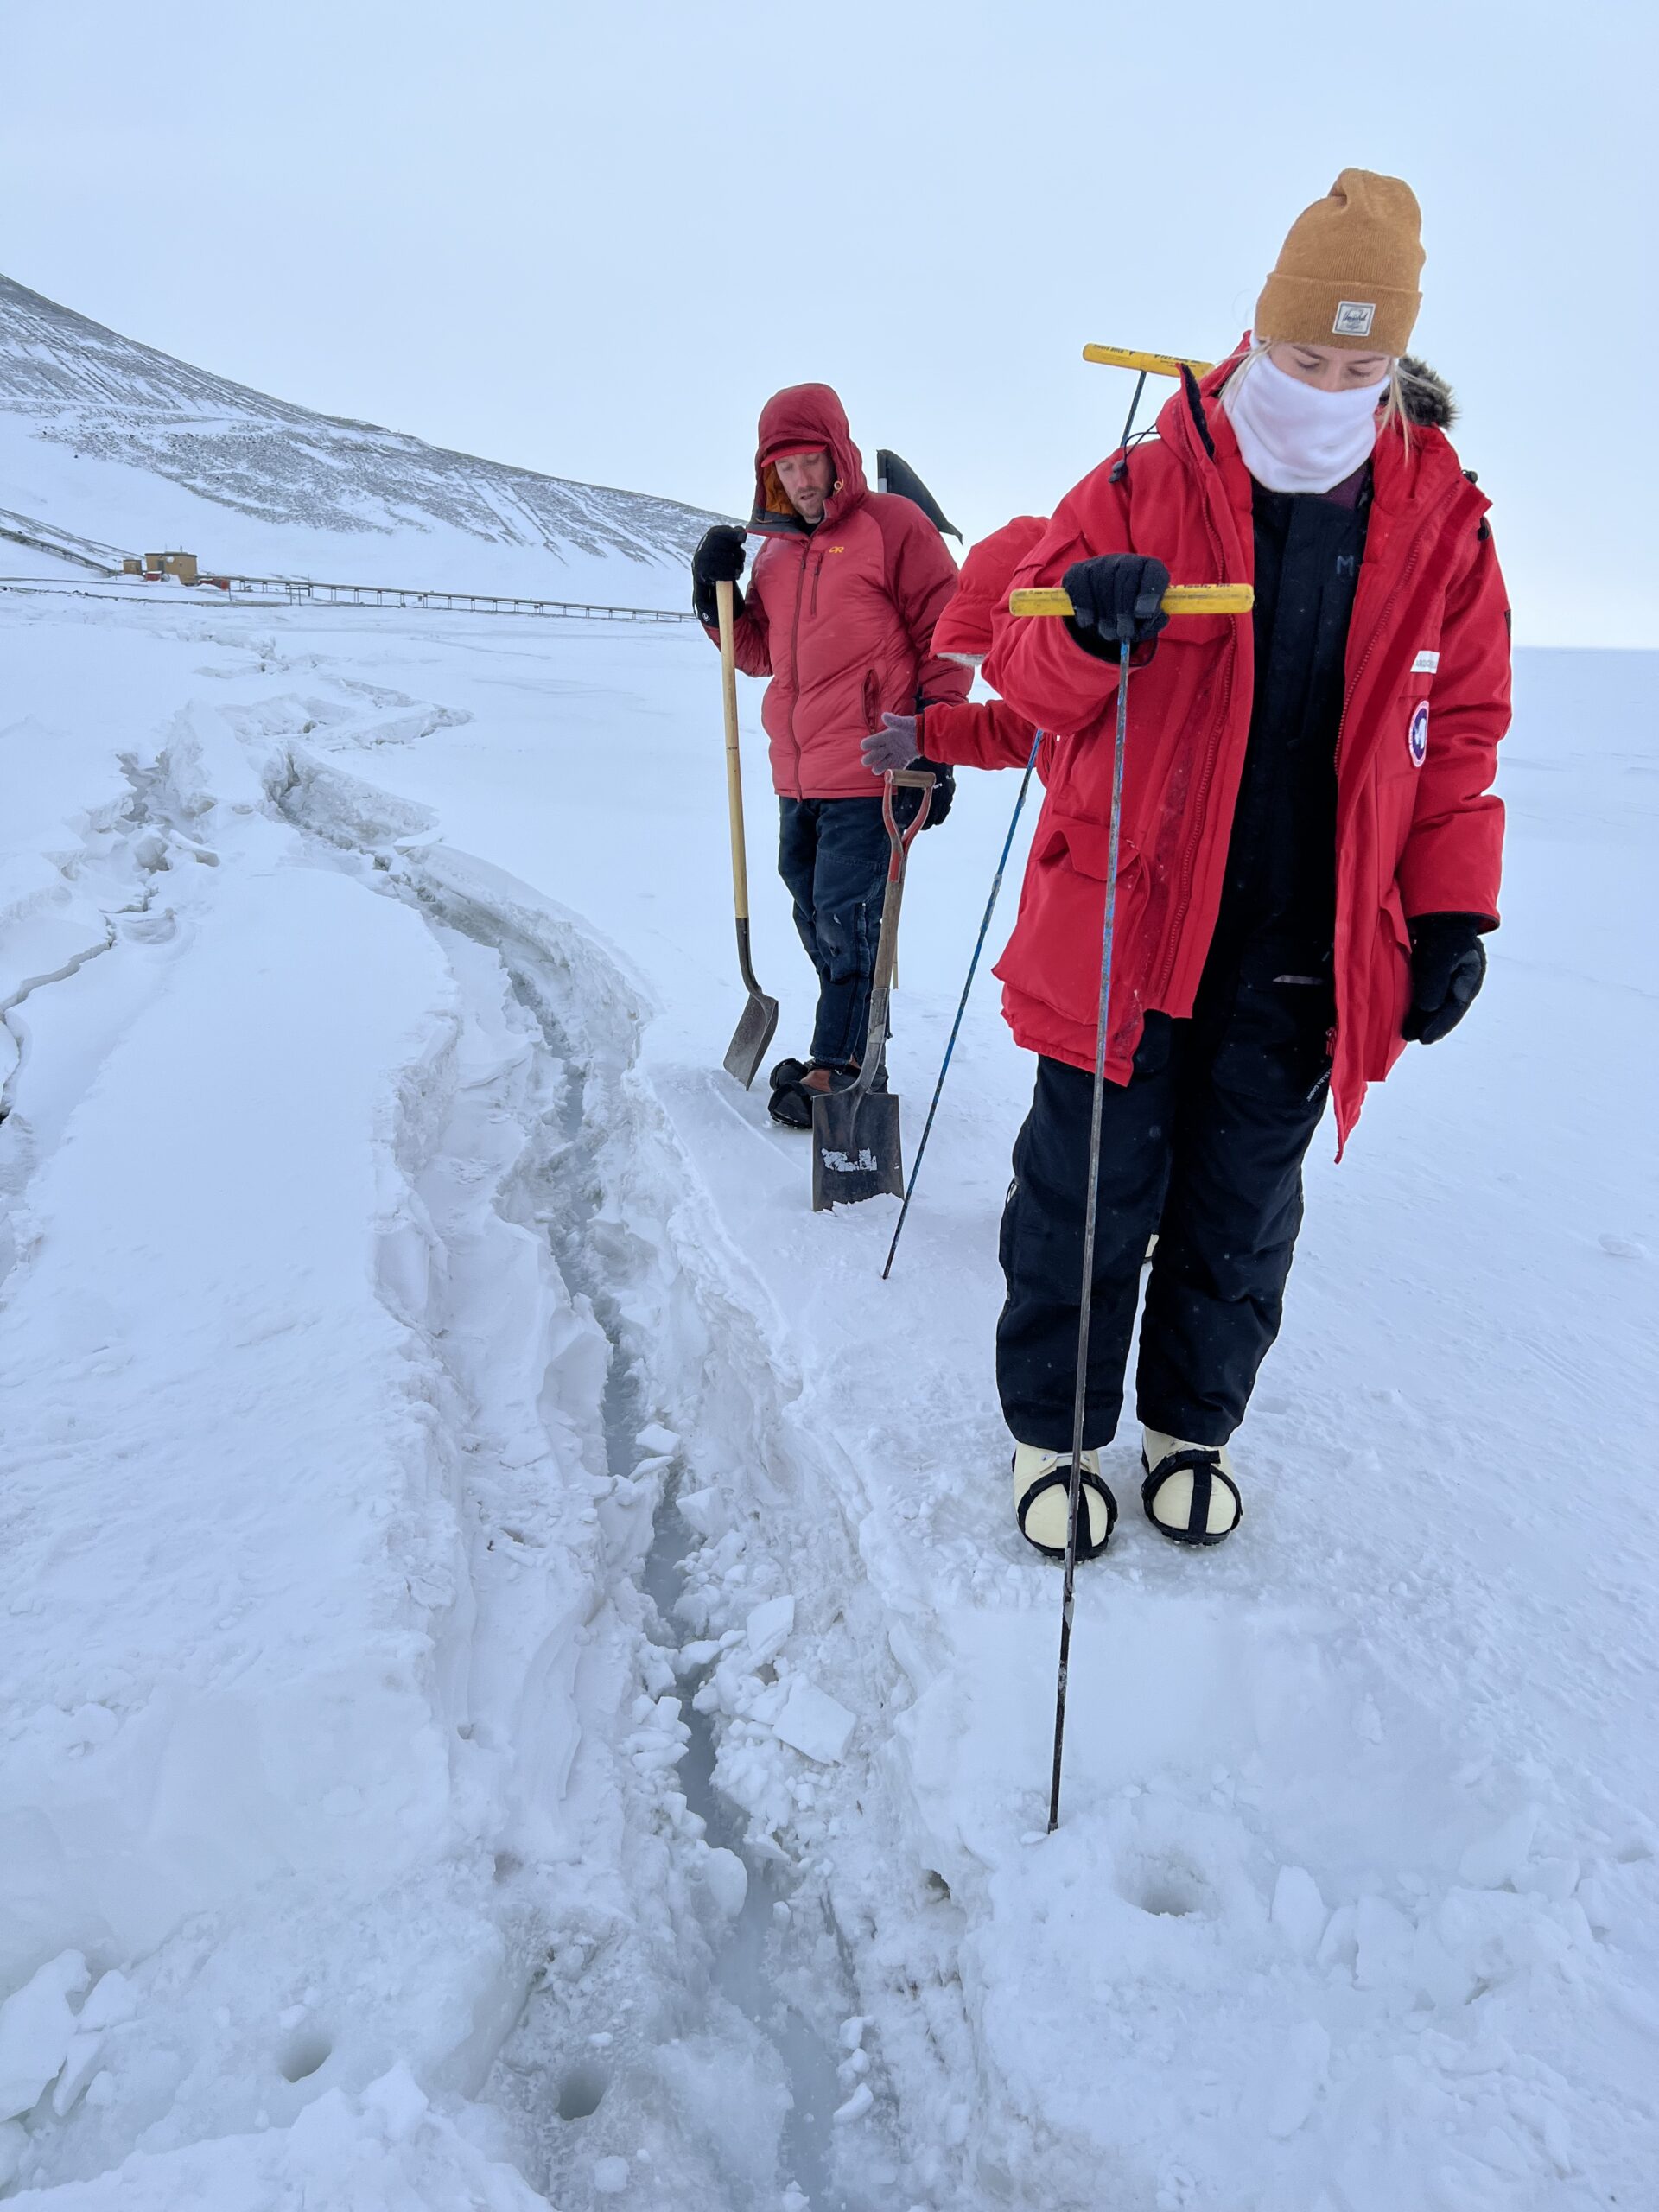
After about 10 minutes of driving we come across a nice Bob-Ross-looking straight-edge crack:
Next, we need to clear the snow away from on top of the crack so that we can see the ice below. It turns out the best way to stay warm in Antarctica is to grab a shovel!

Once we have cleared a strip perpendicular across the crack, it is time to start drilling.
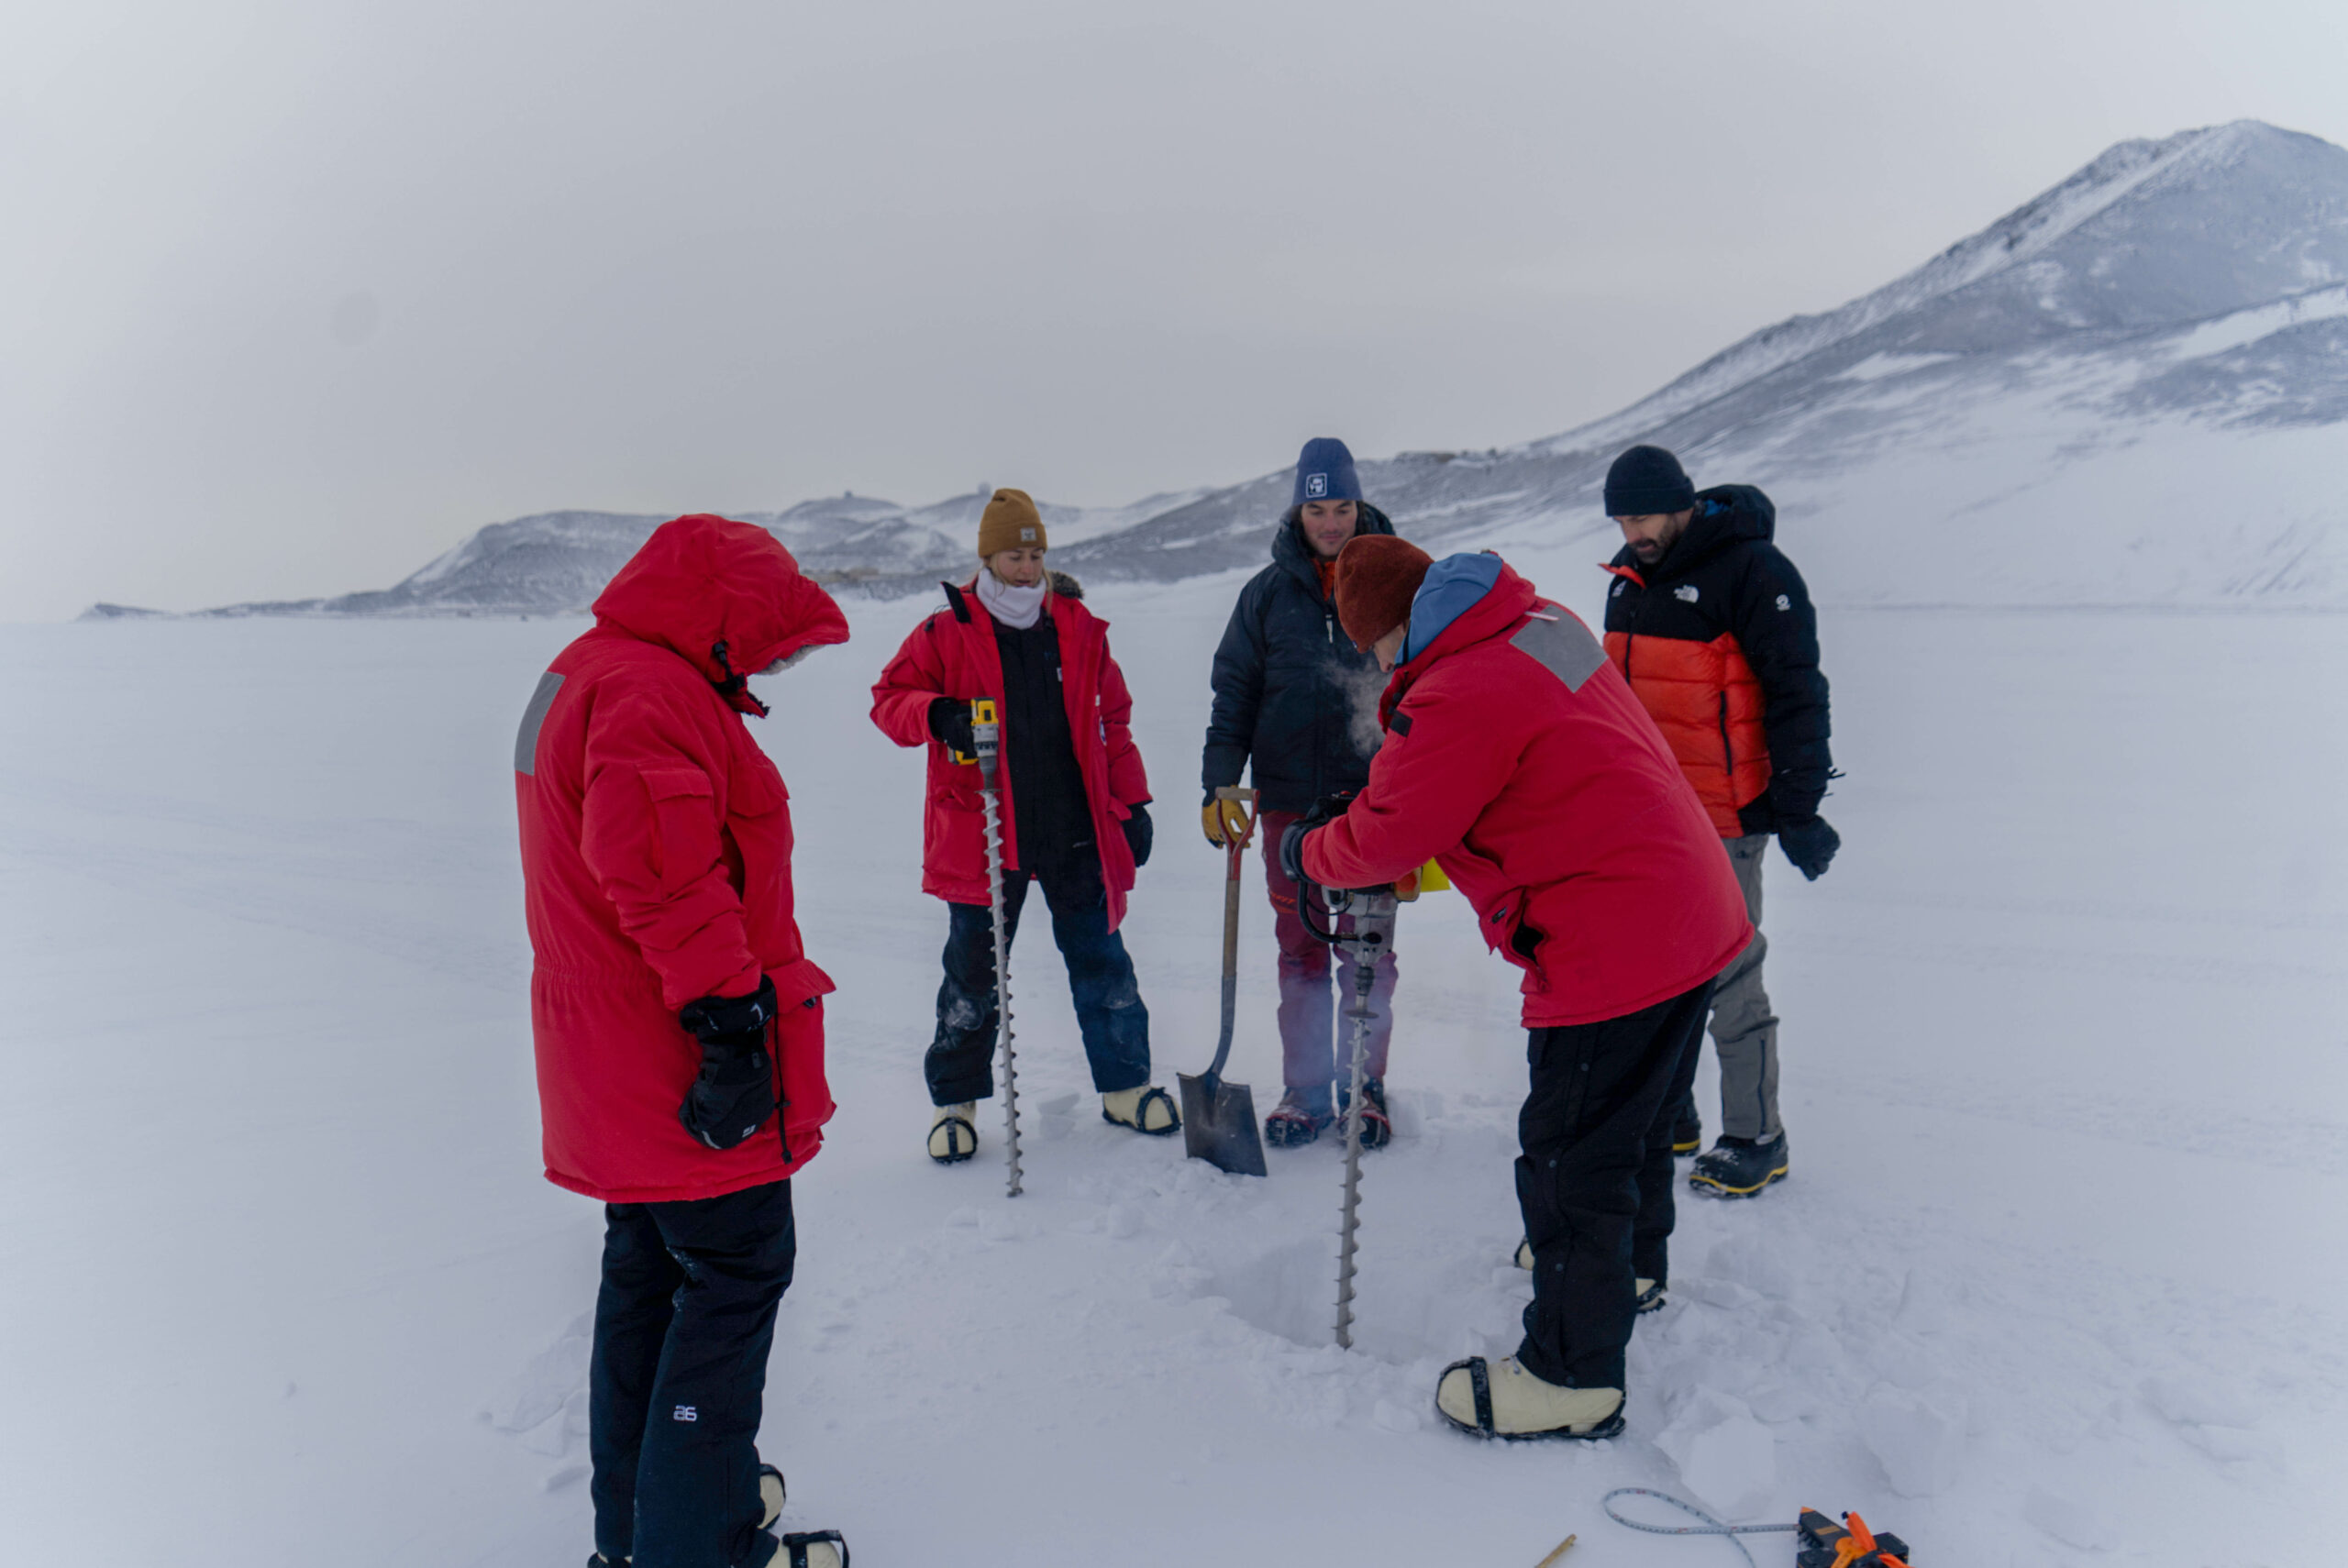
The aim is to drill at several locations on either side of the crack, measure the thickness of the ice, and then calculate the effective crack width. The maximum effective crack width of a given vehicle is equal to 1/3 of the length of the tracks.
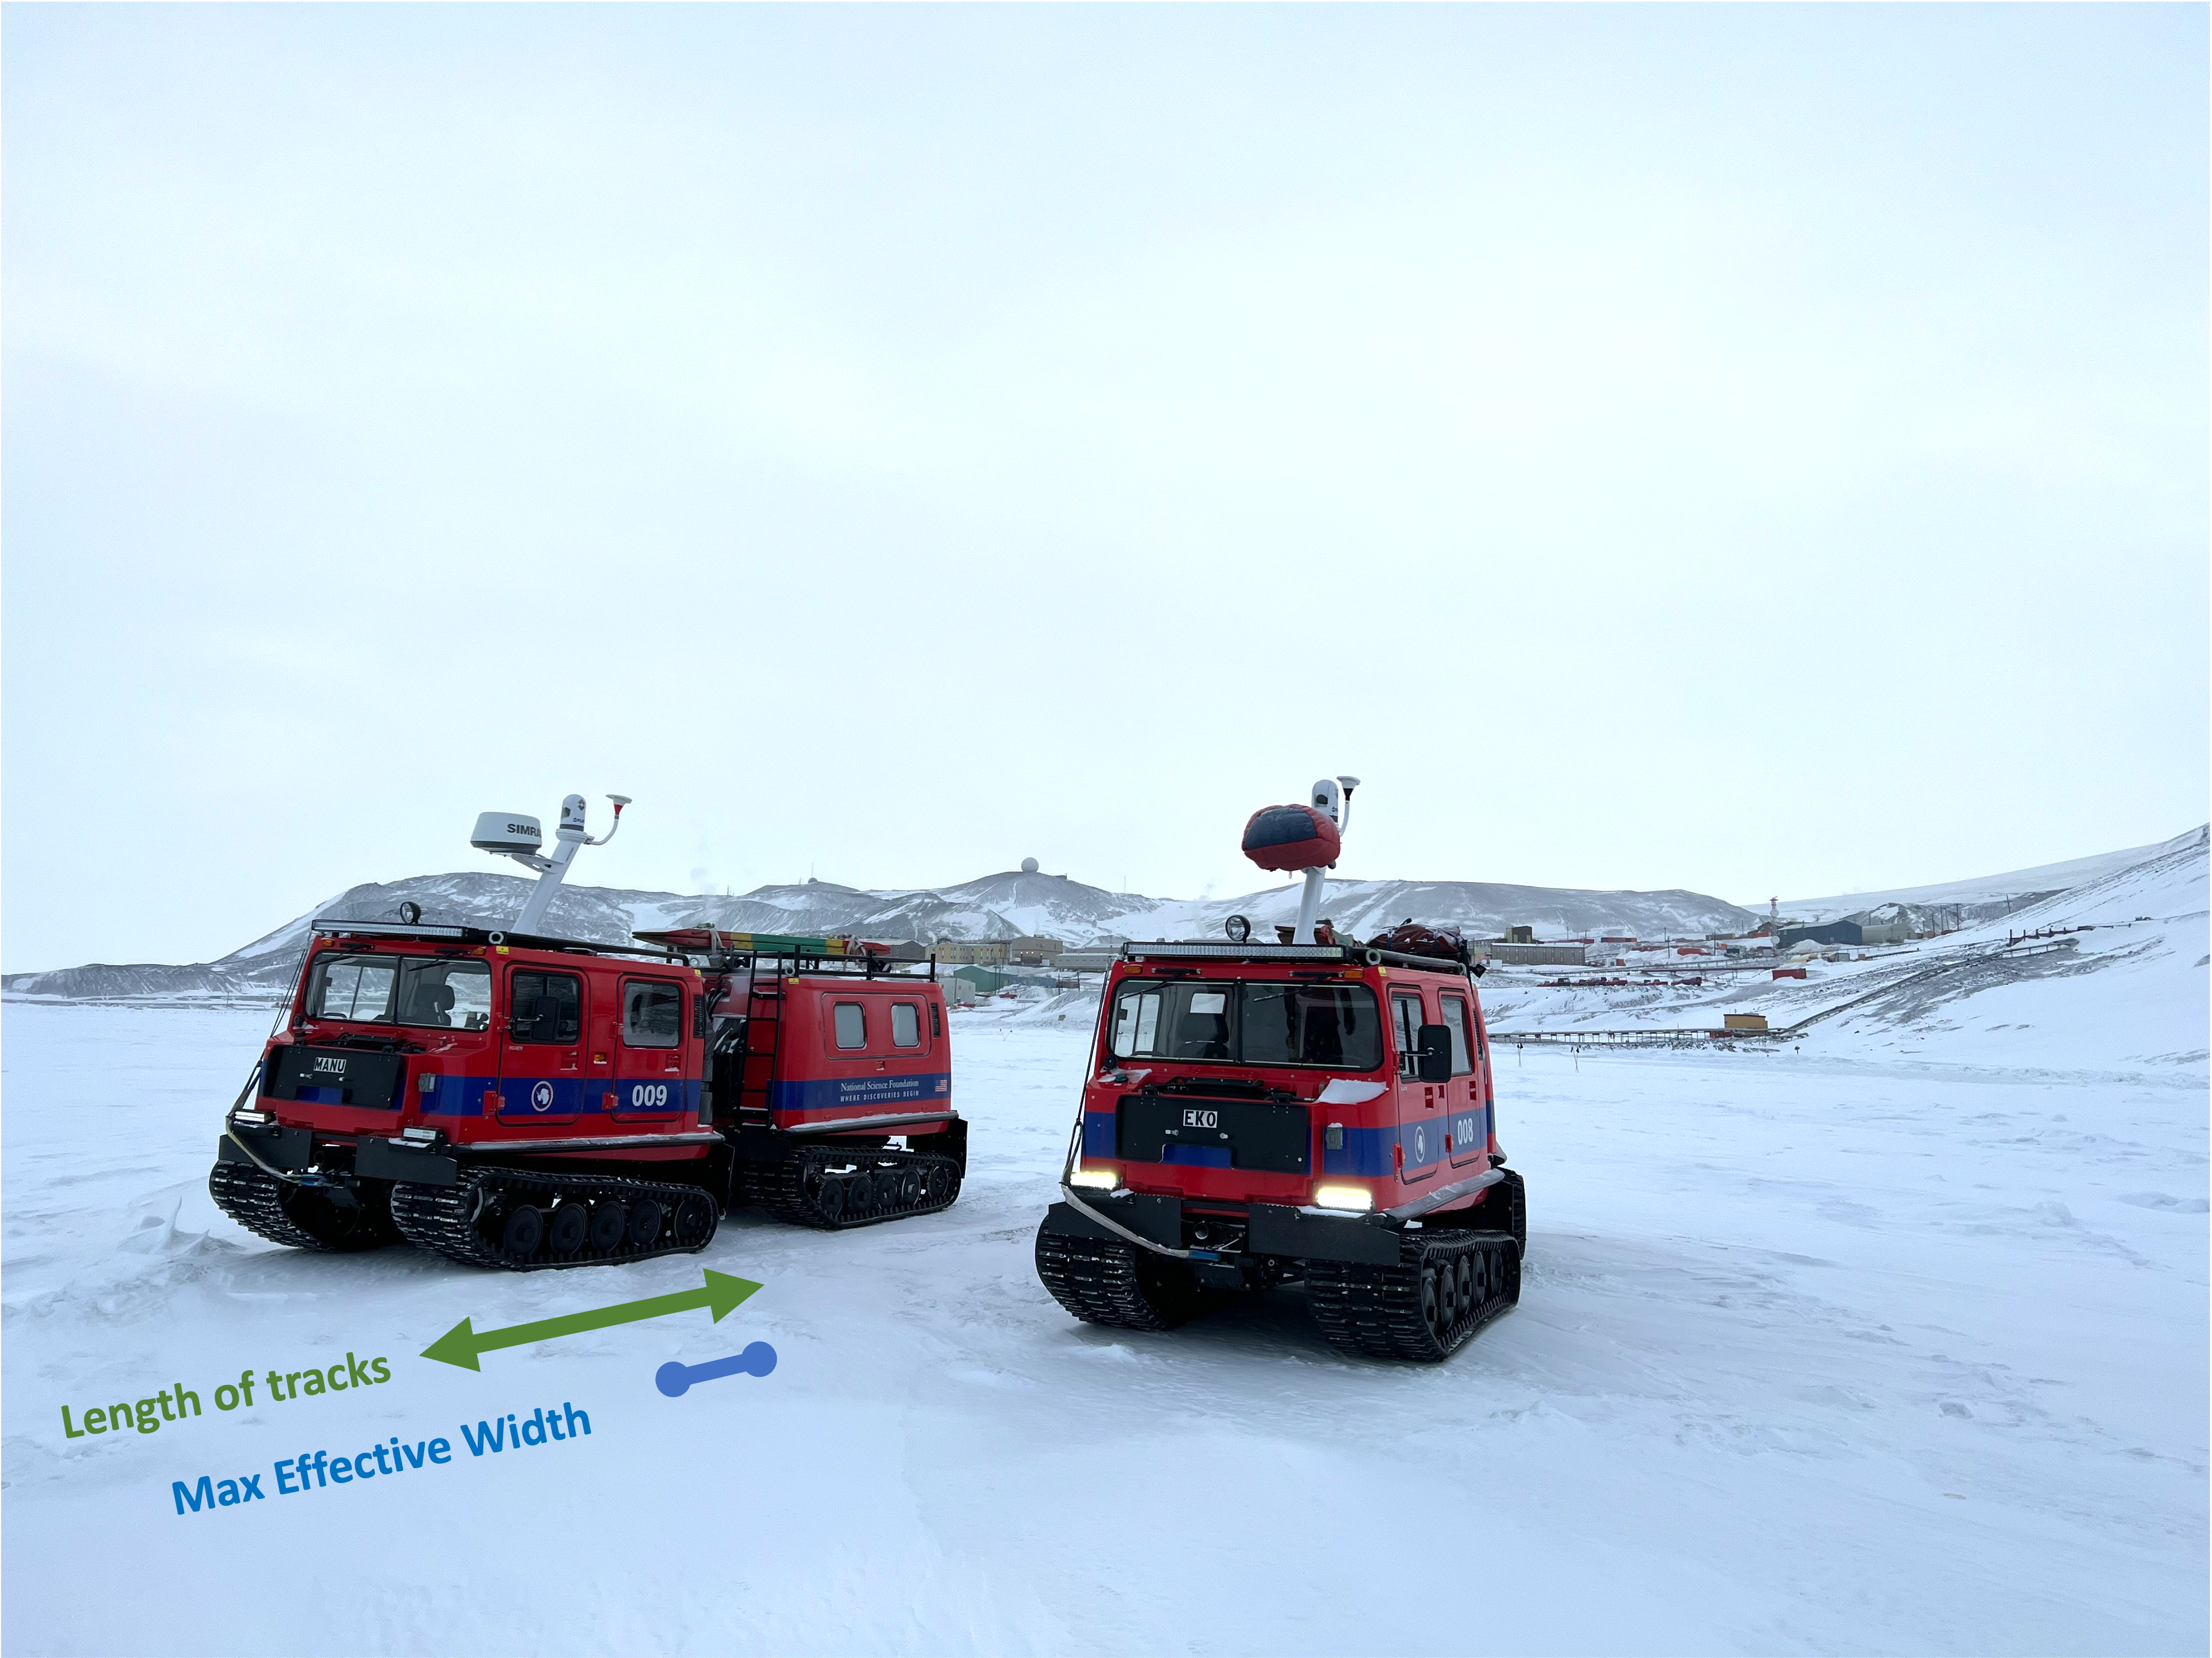
The Hagglund can cross any crack that is less than 70 cm wide, as long as the ice is at least 41 cm thick.
After the holes are drilled, it’s time to measure the thickness of the ice. For that, we use a tape measure with a linear weight at the end. The weight hangs perpendicular to the tape, so once you put it through the hole and lower it down below the ice, you can pull it upwards gently and it will catch on the underside of the sea ice.

This particular crack was in ice that was >2m thick, so it was definitely thick enough for us to drive across.
We then repeated the process with a wider, messier-looking working crack:
And that was it for the day! We were very excited to finally be trained and approved to get out onto the sea ice by ourselves. Thanks to FS&T (Field Support and Training) for showing us the ropes – or the drills as the case may be.

For the past week, we have been diving near the McMurdo Jetty. Our dive hole and hut are located very close to shores of Ross Island, and during our 15ft, 3 min safety stop – we enjoy playing underneath the sea ice close to shore in amongst the wonderous anchor ice.

Achor ice forms in the spring/early summer here in Antarctica. Supercooled water flows out from underneath the ice shelves and moves North. Although this “supercooled” water is only 0.1-0.2°C [or 32°F] colder than the surrounding seawater (the annual mean water temperature in McMurdo Sound is -1.87°C or 28.6°F) the temperature difference is enough to stimulate ice crystal growth.


Beautiful, shimmering crystals form in the water column and larger crystals start to grow on the seafloor. Eventually, a giant blanket of thick interlocking crystals known as “anchor ice” forms on the shallow seafloor, growing up to 2 feet thick in some areas.

Swimming next to this anchor ice is a phenomenal experience. As you gently graze the anchor ice, the crystals break off and float up into the water column. With light reflected in all directions, you feel like you are inside a magical kaleidoscope or surrounded by fairy dust.

The experience of being beneath sea ice is almost indescribable. The colors of blue that pass through the cracks in the snow and ice are so beautiful – it almost reminds me of the milky way!

Turns out, any direction when living in Antarctica!
This morning we took a short training course on how to use handheld GPS (Global Positioning System) units. When wandering around on this harsh continent, the last thing you want to do is end up lost with no idea of how to get back to somewhere warm!
To start out today’s training, we learned about the three different flavors of North: True, Magnetic, and Grid.
Grid North is a navigational term (used by pilots and boat captains) referring to the direction northward along the grid lines of a map. It is associated with map projection, in which the rounded shape of the Earth is projected into a 2D flat representation. Because we are so close to the pole, the map projection can be especially skewed here, so grid north isn’t particularly useful.
Magnetic North is not a fixed point on the Earth’s globe. Instead magnetic north is the direction that a compass points to as it aligns with the Earth’s magnetic field which actually shifts and changes over time in response to changes in Earth’s magnetic core. Here in Antarctica, we are too close to the magnetic south pole, and compasses don’t work here. The Earth’s magnetic field is not arranged in straight lines all the way from the North to the South pole. As you get closer to the Magnetic South Pole, the field lines will dive inwards, perpendicular to the Earth’s surface. Instead of pointing horizontally, your compass needle is actually trying to point straight down towards your feet!
True North (aka geodetic north, of geographic north) is the direction that points directly towards the geographic North Pole. This is a fixed point on the Earth’s globe. For this reason, True North is the best option for navigating down here.
The GPS models we are using down here are the Garmin GPSMAP® 78.

So how does it work? Well, satellites pulse signals down from space which are then received by the GPS unit. Because the Earth is spinning, and there is a delay between when the satellite sends the signal and when the GPS unit receives the signal – there is a margin of error in regards to how accurate your GPS is, and where it thinks you are located. The more satellites that reach the GPS unit, the more accurate it is at pinpointing your exact location. There are fewer satellites covering this part of the globe, understandably, but usually, we can get ~10-20 to connect.
In addition, there is no Wide Area Augmentation System (WAAS) available here either. The WAAS is an air navigation aid that enhances the accuracy of GPS. It uses supercomputers to correct errors. In the absence of WAAS, the accuracy of GPSs here in Antarctica is 9ft – which is not bad!
We use the GPS to mark where our dive sites are. At the moment, we only have one dive hole, located at the Jetty and very close to McMurdo Station. However, if we are able to reach some of the further away dive sites (sea ice thickness dependent), we will definitely rely more on the GPS, especially when the weather is bad and visibility is low!

Q: What is it called when someone smashes a compass? Breaking NEWS 😂
“Whether the weather be fine, Or whether the weather be not, Whether the weather be cold Or whether the weather be hot, We’ll weather the weather Whatever the weather, Whether we like it or not.”
The United States Antarctic Program’s (USAP) McMurdo Station is located on the southern tip of Ross Island, Antarctica. The station is positioned 850 miles north of the South Pole and 2,415 miles south of Christchurch New Zealand.
The mean annual temperature at McMurdo is -18°C (0°F). In the summer months (October-February) temperatures can rise to a cozy 8°C (46°F). However, now (September) we are currently at the end of Winter.
The temperatures during winter can drop to -50°C (-58°F). While the air temperature is often in the tolerable range, the wind chill decreases the temperature substantially and can make it unbearable for any exposed skin. The average wind is 12 knots (2.3 mph), but winds have exceeded 100 knots (115 mph) in the past.

Here is a snapshot of today’s weather forecast. Sunbathing anyone?
Earlier this week, the visibility looking across the McMurdo Sound was substantially reduced due to heavy winds carrying snow. A view that normally looks like this…

… quickly turned into this:

To track how the snow storm, I set up the GoPro on a tripod looking out of our lab window in the Crary Laboratory Building and started a timelapse. I started recording at 3:30 pm on Thursday and stopped recording at 09:30 am on Friday (so 14 hours total). I then sped up the video to condense it into a 30-second clip.
At the start of the timelapse, you can glimpse MacTown citizens scuttling around at the end of their work day. Then the snow starts to gather on the window as the sun sets. During the night, through the gaps between the snow, watch for the waxing crescent moon glide across the sky. Finally, in the morning, the storm has passed and we are welcomed with the glorious sight of Mount Discovery in the distance and the warm rosy pink sky.
While the gathering of snow drifts and heavy winds shown here may seem extreme, this was actually just a mild day at McMurdo. In fact, when I asked whether it was categorized as a storm or a blizzard, I was laughed at. Thanks Andrew!
The weather conditions here at McMurdo are split into three categories, and each category has restrictions regarding if and when we can go outside. Here are the descriptions of the three weather categories and their corresponding travel restriction, as defined by USAP:
Condition 3 – Considered the normal weather condition in McMurdo. Check out with the Firehouse or Central Communications is not required for vehicular travel during summer months, but is required during winter months. Recreational travel is only permitted during Condition 3 weather.
Condition 2 – You must check out with Central Communications by radio prior to leaving McMurdo and check in upon your return.
Condition 1 – All travel by vehicle or foot requires prior approval from the NSF station manager.
Under condition 1 conditions, everyone must stay in the building where they are at the time of the announcement. If you are out in the field, you need to set up your tent from your survival kit. As you cannot go outside, people just have to hunker down and stay put until the storm has passed. Depending on where you are, you may end up stuck in your office building overnight, or if you are lucky, be stuck in the galley! For this reason, it is important to always have food (and a book) stashed in multiple places around town, just in case. Normally, the weather office is able to give people a 2-3 hour warning ahead of time, but not always. The weather in Antarctica is highly unpredictable, and can change at any moment!
Acclimating to the weather here is an important process, I am discovering. As a tropical coral biologist, I usually pack sunglasses and swimsuits when I go on field expeditions for my research. Now, anytime I want to go outside it is a 5 min ordeal of getting kitted up! Once, I made the mistake of thinking I could just run between buildings in just my base-layer clothing. Let me tell ya: that was a mistake! #regrets
If even a tiny part of your skin is exposed to the elements for a minute, all the moisture soon starts to freeze! Here’s Lila after our short walk last night:
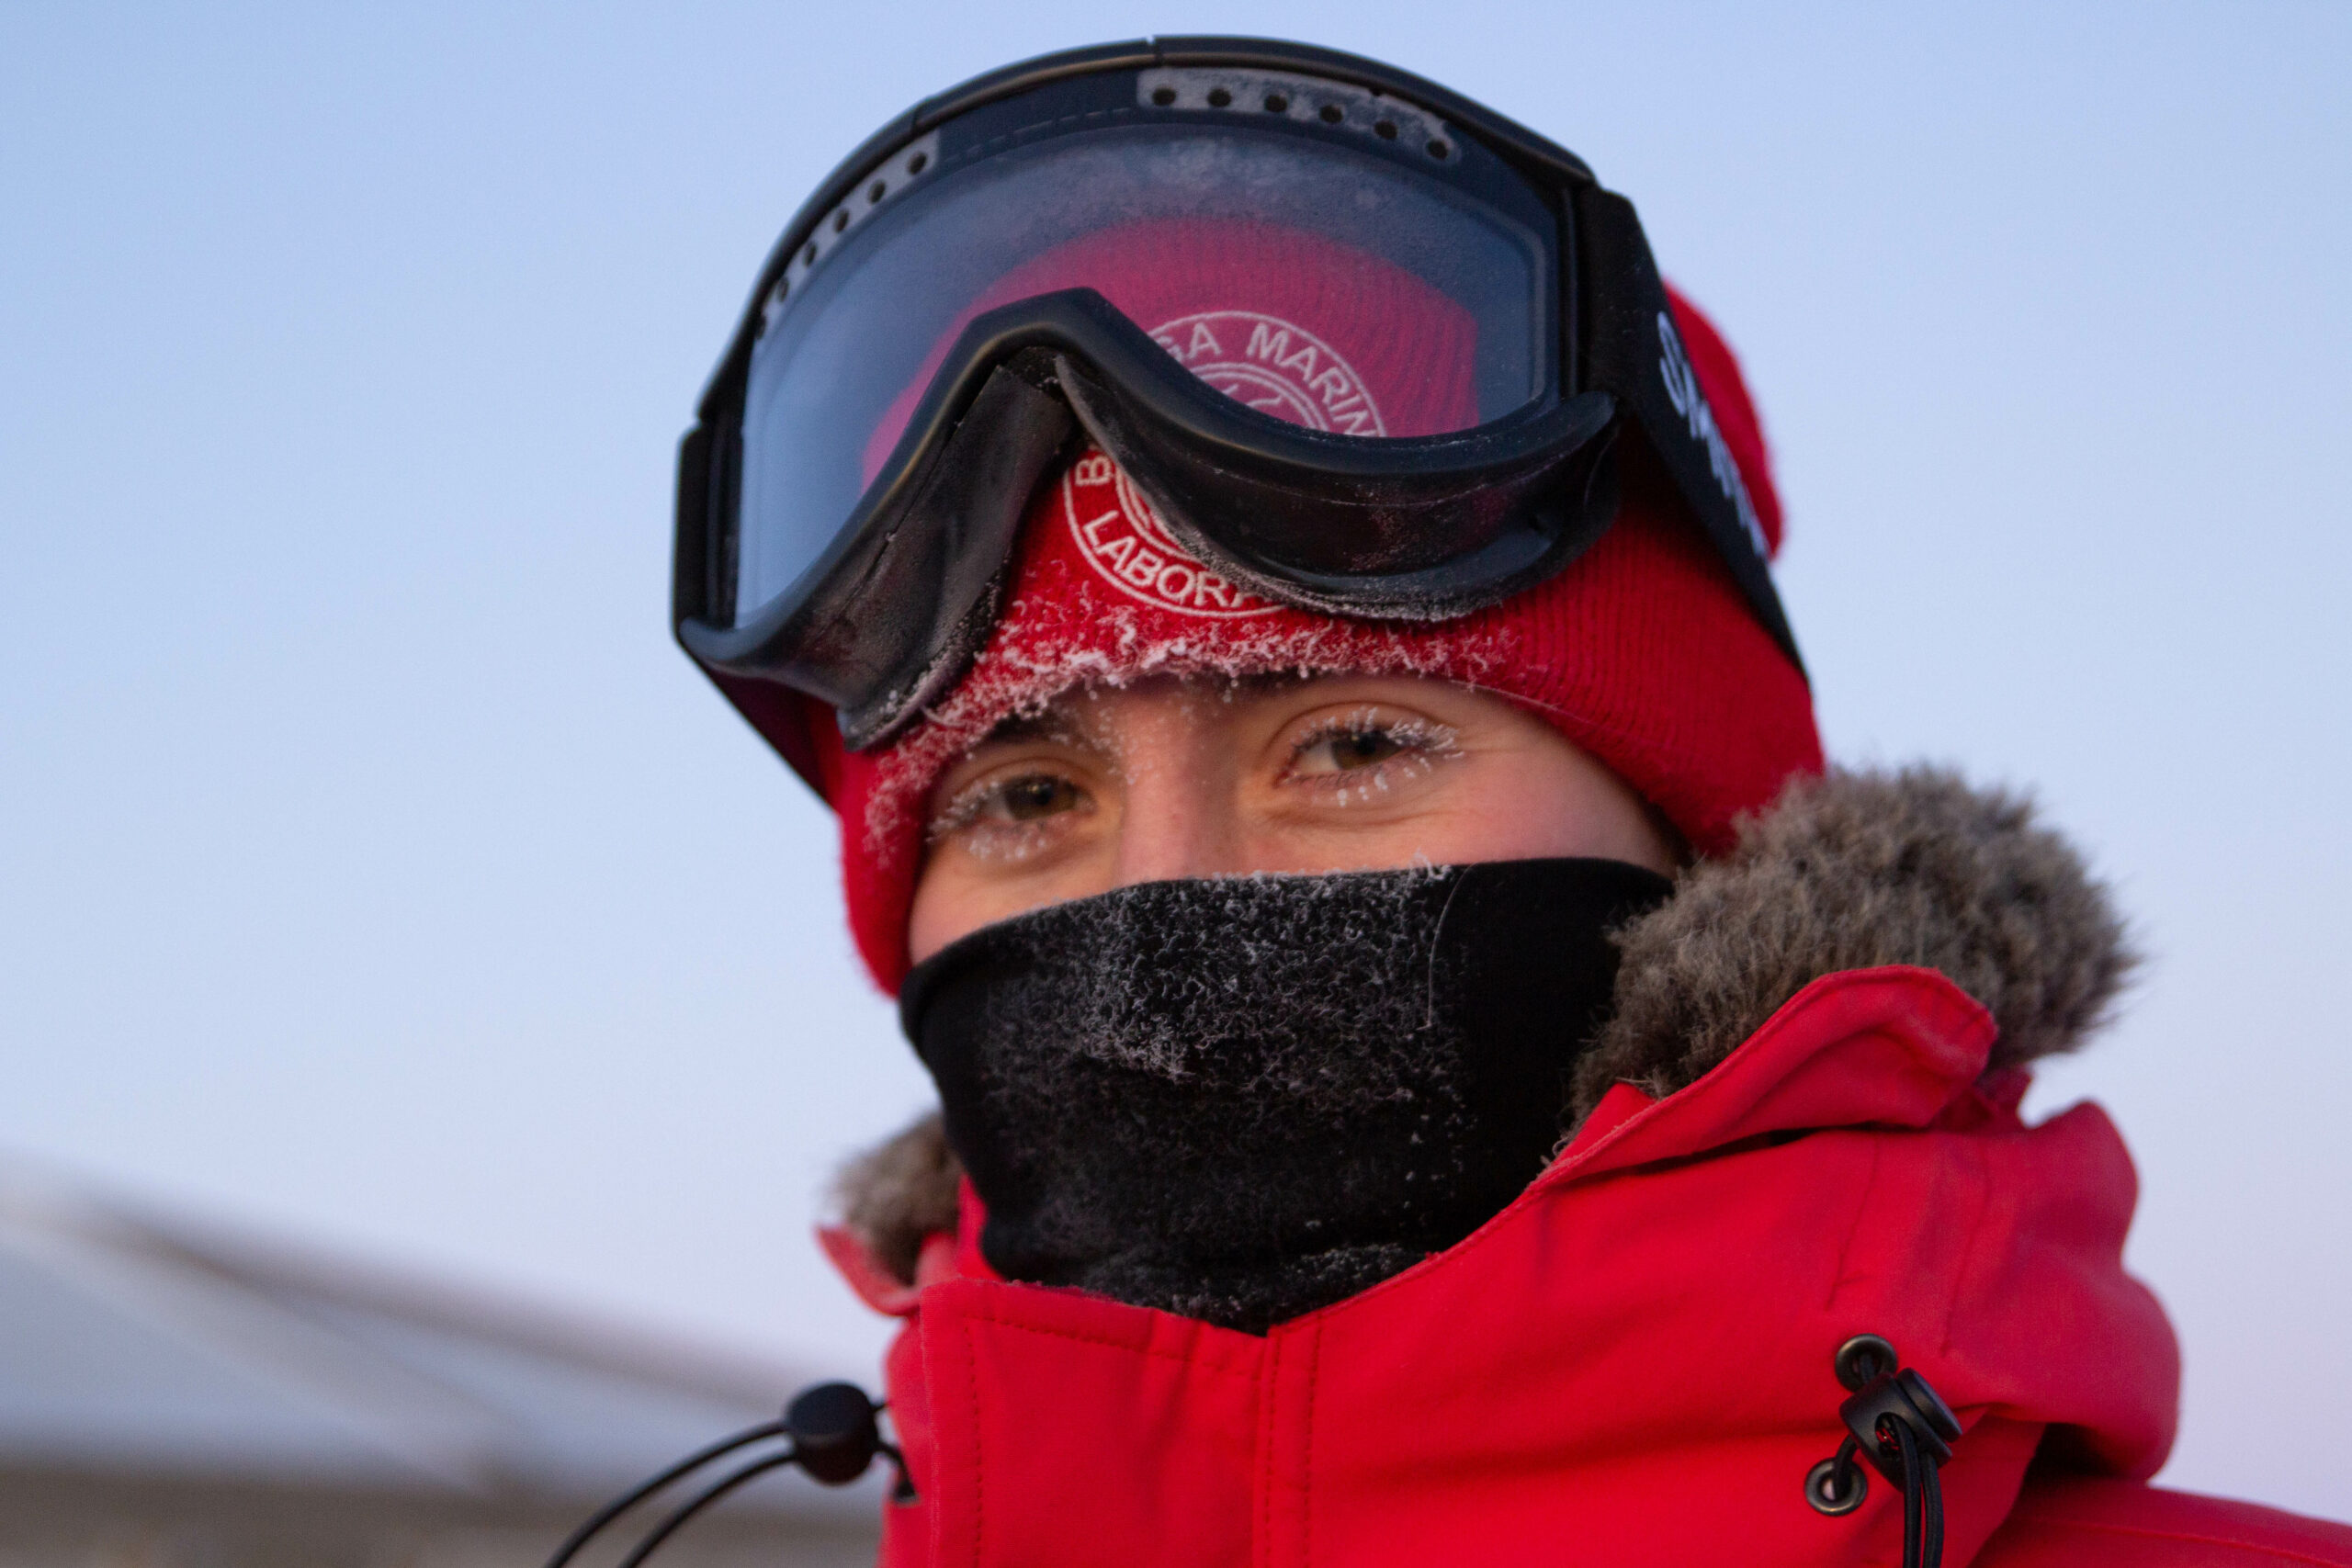
Hey Maybelline, got any ice-proof mascara?
31st August 2022 – our first day on the ice.

We’ve landed. We’ve settled in. And now we are ready to do science, right? WRONG!
Before we are even allowed to leave the station for a casual stroll, we must complete a long list of important training courses that will ensure we are always safe and heathy on this amazing, but harsh continent.
Training course topics include:
Today we started with the Antarctica Field Safety (AFS) course taught by the Field Support & Training (FS&T) center. [P.S. There are a LOT of acronyms used here at McMurdo!]
The purpose of this course is to provide the necessary survival training should anyone find themselves in an emergency situation while working in Antarctica.
Antarctica is one of the most beautiful and pristine places on Earth, but it also presents one of the harshest environments. In particular, the extreme cold, wind and sea ice are potential hazards that can be limb- or life-threatening. Therefore, everyone must be informed and ready to act should something untoward happen. For example, if we were working off-base, far from McMurdo Station and suddenly the weather changed for the worse, we would need to buckle down where we are and ride out the storm.
The first things we discussed in the course were all relating to Risk Management and how to identify, prevent and minimize potential risks associated with working in Antarctica. At first we brainstormed as a group to create a list of objective and subjective risks, including, but not limited to:
We then discussed how to create a 6-step decision making model risk management tool. Again, lots of acronyms used in this part of the course including S.M.A.R.T. goals (Specific, Measurable, Achievable, Relevant, and Time-Bound) and P.A.C.E. planning (Primary, Alternate, Contingency, and Emergency).
Next we learned about survival bags. Every time a group leaves McMurdo base to work in the field, they must take with them a Survival bag. This bag contains everything needed to keep two people alive for three days in an emergency.

Contents of the survival bag:

After looking through the contents, we learned how to use these tools conventionally, as well as creatively. For instance, an ice saw is conventionally used to cut blocks of ice when building igloos and wall, but creatively, this long metal tool can also be used as a splint to set a fracture or sprain. Likewise, the bag itself is used to carry all the supplies, but as this is made from waterproof material, it can also be used as a windbreaker or a mini-tent for anyone entering into mild hypothermia.
Next, it was time to learn how to use the WhisperLite camping stove.

This stove can use a variety of different fuel types including white gas, kerosene, and unleaded gasoline. And it is so compact!

After this, we learned how to pitch BlackDiamond Fitzoy 3-person tents.

Although this model is a little trickier to put up compared to most other tents, its pole design and tight pitch mean that this is one of the sturdiest tents out there and suitable for weathering the harsh Antarctica storms in an emergency situation.
Okay, so the tent is up, but what do you tie the guy lines to to prevent it from blowing away in the gale? There are no trees or rocks on the sea ice… The answer: dig V-thread holes in the ice using ice screws!

You then put the guy line down one side of the v-shaped hole, and use the ice screw to catch it on the other side and pull it up. Next, use a T-hitch and secure your tent to the ice!
The last component of the Antarctic Field Safety course was Cold Illness and Injury. I have to say – although this was arguably the most important component of today’s training – I enjoyed it the least. #Squeamish. This presentation contained lots of visually disturbing images of frost-bitten fingers and toes, and something known as “degloving”. I dare you to google degloving if you are unfamiliar.

Some of the cold injuries we covered were:
Here are some of the less-gory slides from the presentation:


The take-home messages from this part of the training were:
Today’s training was 4 hours long. However, this was actually the condensed version of this course. The full-length version used to be called “Happy Camper” training, but unfortunately, they don’t teach it anymore. In the Happy Camper training, you apparently went out onto the ice, pitched your tent, cut and built an ice wall, and then spent the night sleeping on the ice in the shelter you made! We are all a bit disappointed that they don’t do this anymore as it sounded really fun! Regardless, we learned a lot in today’s course about how to survive in an emergency – and hopefully, we never need to apply any of it!